
Sun Nov 6 00:15:20 CET 2022
there i fixed it: matias tactile pro
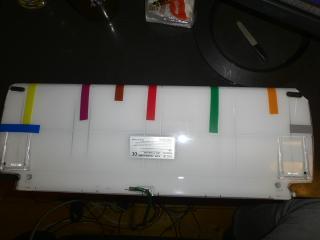
One of my keyboards at home is a very clickety (model M style, too clickety for the office) "matias tactile pro". Here is the vendor blurb.
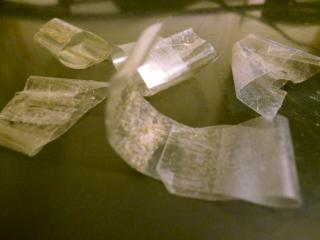
While the typing is great, the plastic shell didn't stand the test of time. It got brittle very quickly, internal clips broke off, and the top and bottom case parts became completely seperated at the front. Occasionally, the the "return" key got stuck with the raised shell and went auto-repeat.
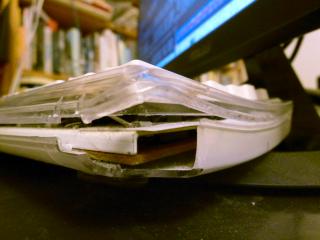
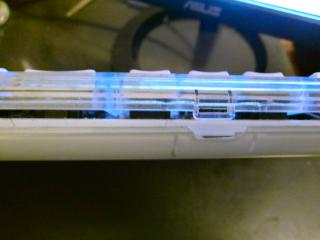

"All the world's problems can be fixed with either gaffa tape or WD40", they say. For the past five years, I used clear adhesive tape but its stickyness is limited, too. Time for some quick renewal:
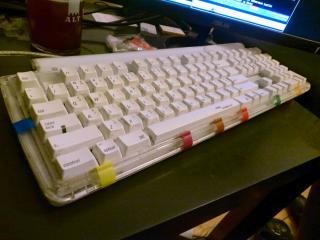
We will see whether this will do the job for the next five days or five years. At least Piet should approve the solution:
Sun Sep 20 00:17:24 CEST 2020
Welcome, hubert!
Welcome hubert.marshlabs.gaertner.de!
And now for something completely different:

The newest addition to the labs is not 7+ years old but spanking new gear: i5-9400, 32GB RAM, 500GB SSD, ... and very, very quiet.
I usually don't put stickers to my machines. The Abteilung-fuer-Redundanz-Abteilung deserves an exception to this rule: their sticker not only matches the colour scheme of the mini-tower/shoebox enclosure perfectly but the six wings also hint at the six cores in the i5-9400.
The machine comes with a big monitor (2560x1440 on 27") and is my new home office workplace.
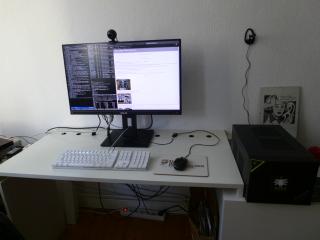
This replaces the the prior work setup of my Lenovo X220 laptop + 1280x1024 external monitor. (Which is way too noisy when used the whole day long.)
I had to shoot the pictures right away because such a clean desk is very rare with me. It was only possible because I shifted all of the entropy to the neighbouring desk:

Both desks feature a row of 2cm holes in the back. These were originally used as air vents for the heating elements the desks covered in the 70ies. Now they are great for much of the cabling.

The cables will be tied up nicely once things have settled.
I still need to learn how to route the audio via the DisplayPort
instead of the analog LineOut/Headphone jacks. Also, having the
keyboard USB-hubbed off the monitor means that I have to re-run my
xmodmap ~/,Xmodmap every time after switching the
monitor off/on. (Probably a job for udev; for now, I let the
screensaver do the work.)
I intend to run hubert as a 24/7 server+workstation. I decided on Proxmox-VE/Debian as OS, extended with the desktop services and applications I need at the hypervisor level.
Hubert should inherit many tasks from
alexis, the Olinuxino ARM board which provided the
24/7 services for the last years. (XDMCP, bootp/tftp, X11 xfs, DNS,
NTP, lpd). Once fz, the NCD X Terminal in the kitchen
can boot/work from hubert, I can give alexis its badly
needed system upgrade.
Sat Sep 19 00:55:52 CEST 2020
Dealing with (not so) dead disks
Harddisks drives fail...
... but in different ways.
Sometimes the integrated electronics board of a disk dies. I cannot cope with these failures -- such a an HDD is truly dead for me.
Sometimes, just "a few" disk blocks become unreadable (and/or unwritable).
And if you are lucky, the disk got just reported as bad but is actually fine for use: I have seen a RAID enclosure for 16 disks which liked to complain about various disks but always in the same two slots -- I rather suspect a problem with the backplane. Then there are those disks which were just subjected to unfair work conditions: too hot. Give them enough cool air to breathe and they cooperate nicely again.
Ditching an entire HDD because a few first blocks become unreadable is justified in a production setting where HDDs are cheaper than the labor to deal with a corrupted disk and the associated data loss.
In my lab, though, this is where the fun begins. Can I put HDDs "with known issues" still to some proper use? Of course:
-
Not all of my data is important. I would not shed a tear about a lost mp3 file ripped from one of my CDs.
-
I can forgo the loss of a filesystem backup -- there will be new ones soon enough.
-
Build RAID systems from risky disks -- that's what RAIDs are for, after all.
This article takes a closer look at a faulty 250 GB disk. It was pulled from a RAID-1 system where it was easily replaced. (By a 500 GB disk because that was the smallest size sold at that time.)
Summary: dd(1), awk(1), jqt(1), smartctl(1).
Test setup
Here is my current backlog of disks to check:
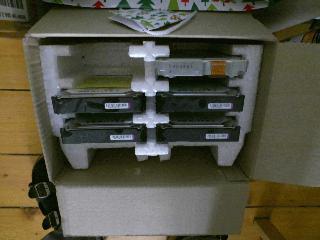
These are mostly 3.5" SATA HDDs, mostly fallout from production servers in the company.
Disks which are checked with some hope for an afterlife go here:
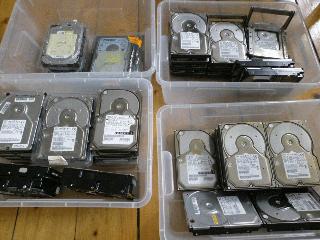
These are mostly SCSI disks of various vintages. I have no shortage on 68-pin WIDE-SCSI disks. 80-pin SCA disks and 50-pins "FAST" SCSI are the real treasure items, I need these most for the workstation gear I carry. (It has actually become more and more difficult to find the 50pin disks.)
Testing is most easily done with external drive sockets such as these:
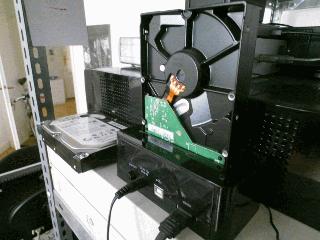
This one takes 3.5" and 2.5" SATA disks (rotating dust or SSDs).
It is attached via eSATA to
fred.marshlabs.gaertner.de, a Core2Duo box running
DragonFlyBSD.
IDE (PATA) disks went mostly out of interest but I would have some IDE-to-USB connector kit for these, too. It's the SCSI drives which cause a bit of pain: these have to be mounted into some computer or enclosure, depending on the interface type.
dd(1)ing through the disk
dd(1) is the swiss army knife to deal with
storage devices of all kinds. It works at the block level and isn't
dependent on the actual data. If vital blocks on the disk have
taken a hit so that your partitioning or filesystem are hosed,
dd is not impacted by that.
In the rest of this article, I move from SI-metric Kilo/Mega/Giga units to 2^10 = 1024-based unit factors throughout. Our disk marketed as "250 GB" is really:
ad10: 239429MB <WDC WD2502ABYS-02B7A0 02.03B03> at ata5-master SATA300
according to dmesg. That 239429MB is just a rounded
value, though. The disk advertises itself to the BIOS with a
geometry of
cylinders=486459 heads=16 sectors/track=63
yielding a total of 490350672 blocks (with 512 bytes), or 251059544064 bytes. This justifies the 250 10^9 marketing GB, but we better see this as "239429 and a bit (2^20) MiB (MebiBytes)" or "almost 234 (2^30) GiB (GibiBytes)".
My first command was simply for reading as many blocks from the disk as possible, starting at the beginning (block 0):
% dd if=/dev/ad10 of=/dev/null
This command supposedly runs through the entire disk
(/dev/ad10) as "input file", reading all blocks and
"copying" them over to Unix' big bit bucket, /dev/null
as output (pseudo) file. In case of a problem with reading a disk
block, it bails out at that point with an error message. In any
case we get informed how many blocks were read/written.
When dd runs, it is silent. On BSD systems, you can
issue a SIGINFO signal to the running process by
hitting Ctrl-T. Dd will respond with the block
position it is currently working on.
Reading just one block at a time is slow. On the first
day, I aborted the dd command after having read
200.000.000 blocks (100 GB) successfully.
On the second day, I picked up reading more blocks where I stopped the day before:
% dd if=/dev/ad10 of=/dev/null skip=200000000
This command stopped with this output:
dd: /dev/ad10: Input/output error
135382768+0 records in
135382768+0 records out
69315977216 bytes transferred in 16899.7 secs (4101616 bytes/sec)
Taking the skipped blocks from yesterday's successful but partial run into account, this translate into:
- The first 200000000 + 135382768 = 335382768 blocks are OK.
- Blocks are numbered and addressed starting at 0.
- Block no. 0 though no. 335382767 are good.
- Block no. 335382768 is unreadable.
I noted that block number down into a simple ascii file and then continued testing, skipping all the 335382768 good and 1 bad block just found:
% dd if=/dev/ad10 of=/dev/null skip=335382769
After just another 1482 good blocks, dd would
detect the next error at block no. 335384251. Note that down, skip
335384251 blocks for the next run, rinse and repeat a few times to
get an initial feeling how errors appear to be distributed. I ended
up with these notes:
200000000
135382768

335382768 blks OK.

335382768       bad
335384251       bad
335402546       bad
335404029       bad
335408476       bad
335449276       bad
335450759       bad
335452242       bad
335453724       bad
335455208       bad
I finished with these manual stop-and-go tests at this point and had a look at the distances from one bad block to the next:
% awk '/bad/ {if (old) print $1-old; old=$1}' ad10-hd.errs
1483
18295
1483
4447
40800
1483
1483
1482
1484
There's some pattern here: if something bad happened to the magnetic coating in none place, we should see the same sector destroyed along a series of neighbored tracks. Perhaps 1483 is the physical track length at this spot, or the sum of the track length's across all disk surfaces. Perhaps a surface defect in a single spot would look like this?
For further bad block detection, I let dd do the
job: the conv=noerror will note every problem but
automatically advance past the troubling block (just like we did
before) and continue from there, until the end of the disk. I used
an initial skip to shortly before the first error already found,
block number 335382768:
% dd if=/dev/ad10 of=/dev/null skip=335000000 conv=noerror |& tee ~/ad10-disk.errs
The resulting output starts like this:
dd: /dev/ad10: Input/output error
382768+0 records in
382768+0 records out
195977216 bytes transferred in 26.313414 secs (7447807 bytes/sec)
dd: /dev/ad10: Input/output error
dd: /dev/ad10: Input/output error
384250+0 records in
384250+0 records out
196736000 bytes transferred in 28.703818 secs (6854001 bytes/sec)
dd: /dev/ad10: Input/output error
dd: /dev/ad10: Input/output error
402544+0 records in
402544+0 records out
206102528 bytes transferred in 32.030519 secs (6434567 bytes/sec)
dd: /dev/ad10: Input/output error
dd: /dev/ad10: Input/output error
404026+0 records in
404026+0 records out
206861312 bytes transferred in 34.588290 secs (5980675 bytes/sec)
dd: /dev/ad10: Input/output error
and continues in this style for another 1500 lines. If you look closely, you'll notice the offset-adjusted "records in" numbers increasingly deviate from the bad block numbers established manually:
335382768  335384251  335402546  335404029  ...
335382768  335384250  335402544  335404026  ...
This is because the bad, skipped blocks are not counted as input
records. Lesson learned: conv=sync,noerror would
replace the unreadable blocks with zeroed blocks for the
destination and include these blocks in the the "records in/out"
counts.
We will fix this up when extracting the numbers with
awk below.
I aborted the run after 13910434 blocks before shutting down the
machine and going to bed. The next day, I picked things up at
skip=485000000, finding no further errors on the
disk.
The results
So these runs located 309 errors on the disk:
% awk '/records in$/  {print $1+bad++}' ~/ad10-disk.errs > ad10.bb
% pr -t5 ad10.bb
335382768     335789372     336188550     336561556     337125282
335384251     335790855     336190033     336561768     337126698
335402546     335792337     336191515     336563251     337129770
335404029     335793820     336197446     336566256     337131186
335408476     335795302     336200663     336566468     337132602
335449276     335798520     336205111     336567739     337134018
335450759     335804450     336206593     336567951     337142754
335452242     335805933     336208076     336569221     337199178
335453724     335807415     336214259     336569433     337200594
335455208     335812115     336215741     336570704     337455984
335458424     335813598     336226371     336570916     337458816
335459907     335815080     336227854     336572186     337473216
335461389     335822745     336229337     336572398     337484784
335462872     335831641     336230819     336573669     337487616
335464354     335860568     336232302     336573881     337497768
335465837     335880093     336238484     336575364     337499184
335469054     335887758     336239967     336739950     337503672
335470537     335892207     336241449     336741432     337507920
335472020     335896906     336250597     336742915     337509336
335473502     335898389     336252080     336744397     337510752
335474985     335899871     336253562     336747363     337513824
335476467     335901354     336496544     336753545     337515240
335477950     335902836     336498027     336755028     348457280
335481167     335904320     336504208     336757993     348796478
335482650     335907536     336513105     337054458     348797894
335484132     335909019     336513317     337057290     348800966
335485615     335910502     336514799     337058706     348802382
335487098     335911984     336517805     337061778     348805214
335488580     335913467     336518017     337063194     348806630
335490063     335914949     336522252     337066026     348808046
335494763     335918167     336522464     337068858     348809462
335496245     335919649     336525217     337073346     348812534
335497728     335921132     336525429     337074762     348813950
335499210     335922614     336526912     337076178     348815366
335500693     335924097     336528434     337077594     348816782
335502176     335925580     336529917     337080426     348818198
335505393     335927062     336530129     337081842     348821030
335506876     335930279     336534365     337084914     348829766
335508358     335930280     336534577     337086330     348831182
335509841     335931761     336535848     337087746     348832598
335511323     335931762     336536060     337089162     348837086
335512806     336094401     336537330     337090578     348838502
335514288     336095883     336537542     337091994     348842750
335517506     336133916     336542030     337093410     348844166
335518988     336135399     336542242     337096482     348847238
335520471     336156659     336543513     337097898     348848654
335521954     336158142     336543725     337099314     348850070
335523436     336159625     336544995     337100730     348852902
335532584     336164325     336545207     337102146     348854318
335541732     336165807     336546478     337103562     348857390
335543214     336167290     336546690     337104978     348858806
335553844     336168772     336547961     337108050     348860222
335771077     336170255     336548173     337109466     348861638
335772560     336171737     336552661     337110882     348864470
335775777     336173220     336554143     337112298     348871790
335777259     336176437     336554355     337113714     348873206
335778742     336177920     336555626     337115130     348874622
335780224     336179403     336555838     337118202     348876038
335781707     336180885     336557108     337119618     348877454
335783189     336182368     336557320     337121034     348883358
335784673     336183850     336558591     337122450     348910742
335787889     336185333     336558803     337123866
And here is a plot. The x-axis is along the trouble spots,
y-axis the faulty block number. I added the blocks 0
and 490350671 for the first and last block of the disk
to put the error positions in relation to the whole disk:
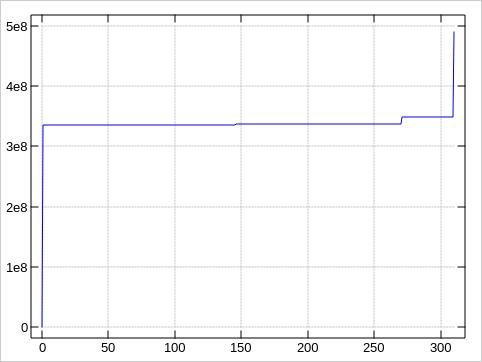
So the first 270 bad blocks cluster in one area, the last 40 ones in another.
Entire faulty range: 335382768 to 348910742 = 13527974 blocks = 6.45 GB
Inner good gap: 337515240 to 348457280 = 10942040 blocks = 5.22 GB
Recovering from bad blocks
With 490.350.672 blocks on our 233 GB disk, we should not get mad if one block gets bad. Bad blocks are just a fact of life.
It would sure be nice that this does not go unnotice. Then again: the system should not panic right away due to a bad black. Disk drives are using checksums and error correction internally to prevent wrong bits being returned to the system. Bits can get flipped at many points though, and filesystems such as ZFS or btrfs will do thier checksums to guard against these things.
Even brand new disks will have bad blocks, and more will evolve with time. It wouldn't be economical for a vendor (or buyer) to bet on "perfect" disks.
There are several methods to handle bad blocks:
-
Sometimes, simply rewriting a bad block can unwedge it again. You have lost the data, of course.
-
Let the disk designate the bad blocks.
Digital Equipment Corporation ("DEC") formulated a standard numbered 144 for their system RK06/RK07 disks. The 144 standard describes how bad blocks are marked as bad. Both the drive controller and the OS can then avoid the blocks where the magic pixie dust has fallen off. The standard is designed to cope with up to 126 bad blocks. Tools such as
bad144(8)let you investigate the current list of bad blocks and mark more blocks as bad.The technology is not dead. Modern drives will do their best to hide such issues from your eyes, too. Disk drives usually come with spare blocks not advertised to the system. The internal drive controller will automatically remap blocks gone bad into spare blocks if possible.
-
Let the filesystem mask out the bad blocks.
For a BSD filesystem,
badsect(8)can prevent bad blocks from being used for regular files. For linux ext2/3/4 filesystems, there isbladblocks(8). -
Partioning around the fault
Use fdisk/gpt/... to prevent suspicious, large areas from being used.
Repartitioning is what I am going to do here. I will define the 7.15 GB from, say, block 335000000 to 349999999 as a "bad" partition, and the space before and after that is still good for healthy partitions. I won't micro-manage he disk by dealing with the good gap within the two bad streaks differently. I would rather play it safe and include more leading/trailing space with the known to be bad area. 20 GB should be plenty to play it safe and yet have much of the disk for continued use.
Saving time -- using larger blocksizes.
Scanning a disk block by block gives you detailed information where the errors are but is very slow. This is why I spent 3 days on this 233 GB disk.
We can significantly speed up things by reading many blocks at time, i.e. tackle the disk with a much larger blocksize option. Here are the first and second GB read from the disk, once transfered in single blocks, and once with 2024 blocks aggregated into a 1 MB transfer size. We read different GBs from the disk to avoid cache effects:
% dd if=/dev/ad10 of=/dev/null bs=1b count=2097152
2097152+0 records in
2097152+0 records out
1073741824 bytes transferred in 134.774307 secs (7966962 bytes/sec)

% dd if=/dev/ad10 of=/dev/null bs=1m skip=1024 count=1024
1024+0 records in
1024+0 records out
1073741824 bytes transferred in 9.100007 secs (117993515 bytes/sec)
Whoa! From 7.6 MB/s to 112.5 MB/s! Warp factor 15! It turns out that even a modest blocksize such as 16 KB gives me 112.2 MB/s throughput.
The maximum throughput is limited by the bottleneck in the chain of
- disk drive performance...
- speed of the SATA/SCSI/FCAL/... bus connecting the disk to the controller.
- speed of the PCI/PCIe/VesaLocal/... bus connecting the controller towards the CPU,
- whatever busses any South/North bridges bring with them,
- ...your CPU.
Exercise for you:
What
ddspeed can you achieve with your disk? Is it related to any marketing number you are expecting from your system? (For example: "SATA-II -- 3 Gbit/s!")
Using a sensible aggregated blocksize, we can map out the 233 GB disk in a mere 40 minutes. Any chunk flagged as unreadable can then be subjected to fine-grained, block-wise analysis.
My first attempts turned out to be miserable failures, though:
Using bs=1g first and then bs=256m, I
caused the machine to
- have I/O failures with the system disk,
- have I/O errors with the network interface (just used for ssh),
- lock up the entire system, requiring the reset button.
I blame the OS for this, DragonFlyBSD-5.8.1 in this case. I
finallly got lucky with bs=1m.
dd if=/dev/ad10 of=/dev/null conv=noerror bs=1m | & tee ad10-1m.dd
created a listing with 175 faults, and these were accompanied by
175 messages from the kernel in /var/log/messages:
Sep 18 16:33:06 fred kernel: ad10: FAILURE - READ_DMA48 status=51<READY,DSC,ERROR> error=40<UNCORRECTABLE> LBA=335382528
Sep 18 16:33:08 fred kernel: ad10: FAILURE - READ_DMA48 status=51<READY,DSC,ERROR> error=40<UNCORRECTABLE> LBA=335402496
Sep 18 16:33:11 fred kernel: ad10: FAILURE - READ_DMA48 status=51<READY,DSC,ERROR> error=40<UNCORRECTABLE> LBA=335408384
[...]
The plots about the error distributions look very much like the first plot, of course:
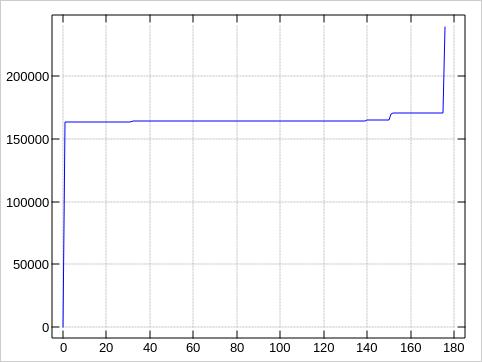
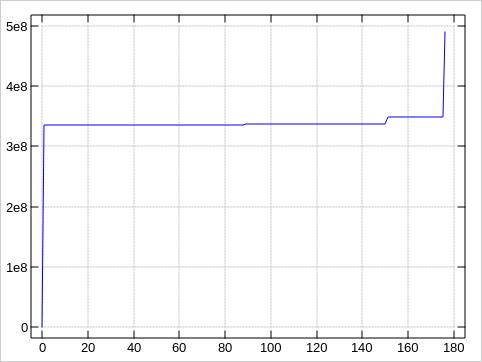
These plots were made by awking the block numbers
from the logs and plotting them with with the jqt IDE
for the j interactive proramming language. J is
very handy to juggle around with data. I used it all the
time for this article, mostly as a calculator for dealing with the
various values and units, for example turning bytes/sec into
MB/s.
If you are stuck with a text terminal, have a look at
ministat(1). This is part of the FreeBSD/DragonFlyBSD
base system and will give you a simple ascii rendition how values
are distributed.
Because our 175 values stack up in just to tall peaks, ending up
in some 130 rows with te default ministat output, let
me sample down the data to just every 10th value for compactness,
and provide the first/last (good) blocks to put the bad block
locations into context:
% printf %d\\n 0 0 239429 239429 > bounds
% awk '0==NR%10' bad-1m > bad-samples
% wc -l bad-samples
      17 bad-samples

% ministat -s -w 65 bounds bad-samples
x bounds
+ bad-samples
+---------------------------------------------------------------+
|                                         +                     |
|                                         +                     |
|                                         +                     |
|                                         +                     |
|                                         +                     |
|                                         +                     |
|                                         +                     |
|                                         +                     |
|                                         +                     |
|                                         +                     |
|                                         +                     |
|                                         +                     |
|                                         +                     |
|    x                                    ++               x    |
|    x                                    ++               x    |
||______________________________A______________________________||
|                                         A|                    |
+---------------------------------------------------------------+
    N           Min           Max        Median           Avg        Stddev
x   4             0        239429      119714.5      119714.5      138234.4
+  17        163796        170278        164278        164922     2035.2878
No difference proven at 95.0% confidence
Beyond dd - be SMART!
The dd command is transferring the data from the
disk drive across the busses into memory -- just to
/dev/null it there.
Modern disks support the SMART feature. You can ask the drive to do self-tests internally, without impacting the I/O system of the computer.
How this is used shall be part of another article, though.
Mon Aug 10 14:08:52 CEST 2020
One-Time Passwords in the BSDs
Some Historic Background
One-Time-Passwords (OTPs) in the BSD systems derive from Bell Communications Research's orignal S/Key system from 1981. Bellcore provided their sources (skey v1.1). Others extended these with patches (such as adding alternative hash algorithms) and devised patches for services such as ftp to use these one-time passwords. Notable was the kit from the US Naval Research Labs (NRL), called OPIE (One-time Passwords In Everthing), avoiding the trademarked S/KEY moniker.
RFC 1760 "The S/KEY One-Time Password System" [1995] describes the system and provides a good bibliography. Followups are RFC 1938, obsoleted by RFC 2289, "A One-Time Password System", which made it to "STD0061".
Back then (in the eighties / early nineties) most TCP/IP traffic was not encrypted and one-time passwords were a significant aid against broken accounts. It was seldomly used in my circles back then (academia), though, and you looked pretty geeky/nerdy when you pulled out a slip of paper to lookup your next password.
These days, ssh has become the defacto standard for
remote access. Any paswords are encrypted when using
ssh, and more and more people are getting comfortable
with using public keys instead of passwords.
So: why still bother with one-time passwords?
I'm travelling around a bit, and it is often convenient to just use the computer of a client customer, friend, hotel lobby, or conference PC connected to the beamer to log into a home machine, without lugging my own laptop around. I generally trust the people I am visiting but can I trust their machines to not have been hacked from wherever and run some keylogger software? Just with my geekier friends.
Do I want to enter my password on these machines? No. Do I want to give access to my ssh private key to these machines? No.
One-time passwords combined with ssh are indeed an attractive option in these situations. So I had a fresh look into the current state of affairs. The last one had been twenty years ago, and I had forgetten everything by now.
Using One-time passwords
You can give one-time passwords a try without having to fear anything bad or inconvenient:
- Where you used to be prompted for your password, the prompt will also indicate the sequence number for your currently possible OTP.
- Your standard password will continue to work.
- Alternatively, you can print a list of numbered OTPs and pick the indicated OTP. (If you ever used a printed TAN sheet with your bank account: that's just the same.)
You can use either password type whenever you like; you are not fixed on just one specific type at any time.
Here is sample session how to use the system, based on NetBSD's commands:
% skeyinit
Password:
[Adding neitzel]
Reminder - Only use this method if you are directly connected
       or have an encrypted channel. If you are using telnet
       or rlogin, exit with no password and use skeyinit -s.

Enter secret password:
Again secret password:

ID neitzel skey is otp-md4 100 hack37924
Next login password: SOWN FLY MUTE NOR HONK FORE
The first password asked for your is about your standard system password. It is asked to authorize you, after all you are adding another access method to your account right now.
The second, "secret password" is one of the ingredients for generating the list of one-time passwords. You will need it later on to print your OTP list. The "secret password" is supposed to be independent of your system password, but truth be told: I just re-used my standard system password here, it fit the bill for "at least 10 characters".
The last paragraph is kind of "off-by-one" and highly
misleading. Yes, the system is now setup to provide a sequence of
up to 100 OTPs for you, but you will never encounter the
otp-md4 100 hack37924 OTP challenge above, and you can
just forget the "Next login password".
All OTP passwords are "fixed width" 64 bit values. They can get
rendered as hex strings (16 places) or as a sequence of six
pronouncable words. The phrase SOWN FLY MUTE NOR HONK
FORE above equate the hex value
e3028f039669a309 but are much easier to remember and
transcribe.
The following is going to be your real, first OTP challenge. You can enquire it anytime:
% skeyinfo
Your next otp-md4 99 hack37924
Look, Ma, 99 not 100!
At this point, your login prompt also changes:
% ssh -p 222 hackett
Password [ otp-md4 99 hack37924 ]:
You can now use either your usual password or the OTP matching
the current otp-md4 99 hack37924 challenge.
How to know that OTP? Create a list when you are in your trusted network and can re-enter the "secret password" from above safely:
% skey -n 5 -t md4 99 hack37924
Reminder - Do not use this program while logged in via telnet or rlogin.
Enter secret password:
 95: BREW NE HA GERM CUNY HARM
 96: TUM DEAF OTTO JILT TILE WOW
 97: GILD SAN DOSE COCA SAIL BOMB
 98: WING IRK LUSH BAY SARA BERG
 99: OLDY PAT CAST GIG VAIL TRIO
So the OTP matching the the current challenge is the word
sequence OLDY PAT CAST GIG VAIL TRIO. You may enter
the sequence in lowercase but do not omit the spaces. You could
also enter the OTP's hex rendition (c7c649910b7f2fdf,
available through skey -x ...) if you enjoy to
flagellate yourself.
You could print a longer list with the next, say, twenty OTPs and put this little sheet into your wallet.
Mind you:
(1) This is close to the notorious passwords on yellow post-it stickers.
(2) OTP-ing from remote into your favourite jump-host just to issue long-time passwords from there and have these key-logged may not be the smartest move.
Comparing the current BSDs
-
NetBSD 1.3.3 -- 9.99.x:
Has the
skeysuite in the base system:skey(3) - one-time password (OTP) library pam_skey(8) - S/Key PAM module skeyinit(1) - change password or add user to S/Key authentication system skeyinfo(1) - obtain the next S/Key challenge for a user skeyaudit(1) - warn users if their S/Key will soon expire skey(1) - respond to an OTP challengePossible hashes are: MD4 (default), MD5, SHA1
The
heimdahlpackage comes with its own one-time password tools,otp(1)andotpprint(1). -
OpenBSD:
Has the
skeysuite, too, but different from NetBSD:- it provides the
login_skey(8)utility to hook S/Key services into other programs. (OpenBSD does not use the "PAM" framework.) - It discarded the original MD4 hash and offers MD5, SHA1, and RIPEMD-160 instead.
- it provides the
-
FreeBSD-4.7 and 12.1: provide the "opie" ("one-time passwords in everything") suite of tools in the base system:
opie(4), OPIE(4) - One-time Passwords In Everything
opieinfo(1) - Extract sequence number and seed for future OPIE challenges
opiekey(1), otp-md4(1), otp-md5(1) - Programs for computing responses to OTP challenges
opiepasswd(1) - Change or set a user's password for the OPIE authentication system
pam_opie(8) - OPIE PAM module
pam_opieaccess(8) - OPIEAccess PAM module
opiekeys(5), /etc/opiekeys(5) - OPIE database of user key information
opieaccess(5), /etc/opieaccess(5) - OPIE database of trusted networks
Usable hash algorithms: MD4 (compatible with Bellcore S/Key), MD5 (the default on FreeBSD).
-
DragonFlyBSD-5.8:
The DragonFly BSD Handbook has a chapter on security. It explains both the OPIE and S/Key suites in detail.
However, neither is in the base system anymore, or available as a package instead. DragonFlyBSD-5.6 was the last release coming with OPIE support.
The Actual S/Key Algorithm
During skeyinit, the first few letters of the
hostname (hackett here) and some random number form
the "seed" string: hack37924 here.
The seed string is concatenated with your "secret password".
This is hashed once, using the selected hash algorithm, say md4,
into md4("$seed$secret"), 128 bits. These are condensed ("take the
first half") into the 64 bits being the OTP matching the challenge
md4 1 hack37924.
Take the hash of previous hash, i.e.
md4(md4("$seed$secret")), condense those 128 bits that
into the 64 bit OTP matching challenge md4 2
hack37924.
Rinse and repeat, say a hundred times.
S/KEY and service integration
On NetBSD, the Pluggable Authentication Modules (PAM) framework
is used to to tie the SKEY/OPIE method into various services. As
soon as you have gone through the skeyinit procedure,
you can use your OTP list all over the place: the
system stanza makes it a default authentication
method. The following services have it explicitly enabled on top of
the default:
display_manager
ftpd
sshd
su
It will just work, without turning any knobs.
One small caveat: As already mentioned above, the optional,
non-base heimdahl package comes with its own OTP
system. Services from this package, such as popper(8),
are not tied to the pam_skey.so module. You need the
setup with otp(1) and thusly a separate OTP list to
use these services. Also, popper(8) needs the -a
otp option to rely on the OTPs.
Tue Jun 9 17:59:57 CEST 2020
Happy Uptime, ips!
After missing the 2000 days milestone:
Last login: Tue Jun  9 13:16:53 from kenny.gaertner.de
ULTRIX V4.4 (Rev. 69) System #17: Tue May 28 10:12:31 MET DST 1996
~~~
---
You have mail.
neitzel 1 > date
Tue Jun  9 13:18:47 MET DST 2020
neitzel 2 > uptime
  1:18pm  up 2222 days, 22:22,  8 users,  load average: 0.21, 0.05, 0.00
neitzel 3 >
Wed May 27 09:28:47 CEST 2020
lowell on 6.46.6: upgrading RouterOS without enough flash
Upgrading the RouterOS on MikroTik devices is a simple affair:
- You check for new firmware;
- if there is any, review the release notes;
- download, install and reboot;
- update the bootloader in a separate step,
- followed by a second reboot.
All this is usually done in five minutes. So far I never had any issues caused by an RouterOS update.
Which makes you buy more MikroTik gear. The youngster in my home is...
lowell.marshlabs.gaertner.de
[neitzel@lowell] > /system routerboard print
       routerboard: yes
    board-name: hAP lite
         model: RouterBOARD 941-2nD
     serial-number: 7C2C07C4455B
     firmware-type: qca9531L
  factory-firmware: 3.36
  current-firmware: 6.46.6
  upgrade-firmware: 6.46.6
This is a cheap (22 EUR), small wireless router/switch/access
point serving my kitchen. Permanently attached nodes are NCD X
terminal terminal fz and the
DAB+/FM/Internet/LAN-Media radio gaga.
Lowell is supposed to replace the small cisco
switch lab there but, as of now, they all still share the window
sill:

Updates vs. IPv6-only
I have run out of my public IPv4 addresses at home long ago.
Because lowell is currently mostly just operating as
an access point it doesn't need any layer-3 address except for
management. And so it became my first IPv6-only node, without any
IPv4 address at all.
This was all fine. Until I tried the first RouterOS upgrade.
As tcpdump showed the upgrade process will resolve
the server name
download.mikrotik.com has address 159.148.172.226
download.mikrotik.com has address 159.148.147.204
download.mikrotik.com has IPv6 address 2a02:610:7501:4000::226
download.mikrotik.com has IPv6 address 2a02:610:7501:1000::196
which apparently would serve both the current and the vintage protocol flavours. The hAP though will first try an IPv4 server, notice that that network is unreachable, and... give up. What a shame!
This short-coming is particularly disappointing because the RouterOS can transfer data via IPv6 when asked manually:
[neitzel@lowell] /file> /tool fetch url="http://hackett.6.ml.gaertner.de/index.html" output=user
      status: finished
  downloaded: 0KiB
    data: All my friends and I are crazy. That's the only thing that
          keeps us sane.

[neitzel@lowell] /file>
D'oh!
Workaround: for RouterOS updates, I temporarily /ip
dhcp-client enable 0. Do the upgrade dance, and /ip
dhcp-client disable 0 again.
Not nice but there are worse things in life.
Updates vs. Flash Size
Hey, let's just spend fifteen minutes on upgrading all three MikroTik gadgets, I thought around 8pm. When I went into bed, it was around 5am.
The upgrades went without a hitch on the two larger devices,
billy and hall but on lowell
strange things would happen. The "download" step went fine but the
"reboot for install" step would end up in the same old package
versions as before (6.46.2), with the download new version (6.46.6)
purged from the /file area. Repeated attempts didn't
help.
WLKIKIV, as we say here, and a quick /log print
shows the problem:
not enough disk space.
The "hdd" flash memory is indeed much more constrained on
lowell:
% echo billy hall lowell | \
> xargs -n1 -Ixx ssh xx /system resource print | \
> grep -E 'hdd|board-name'
       free-hdd-space: 107.3MiB
      total-hdd-space: 128.0MiB
           board-name: RB2011L
       free-hdd-space: 109.0MiB
      total-hdd-space: 128.0MiB
           board-name: CRS125-24G-1S-2HnD
       free-hdd-space: 7.1MiB
      total-hdd-space: 16.0MiB
           board-name: hAP lite
%
The size of the stock "combo" release packages is now
approaching half of the 16.0MiB disk size:
% echo 2 6 | xargs -n1 -I X lynx -head -dump \
> https://download.mikrotik.com/routeros/6.46.X/routeros-smips-6.46.X.npk |\
> grep Length
Content-Length: 7651050
Content-Length: 7700154
%
During an upgrade, both the old and new version have to sit side-by-side on the disk, the filesystem structure needs some space, the config needs some space, ... the official documentation is asking for 2 MB spare capacity. After this download though I was down to the last 44 KB(!) on the disk.
A few months ago, in the same situation, I found a surplus support-dump I could delete to gain enough breathing space. No such luck tonight.
With the current RouterOS "Stable" images, things have now simply become too tight for a stock "hAP lite" and similar devices. without much extra config/data on its flash medium to upgrade to newer stock RouterOS versions. To be frank, this is major surprise if not a disgrace.
Me vs. the Web Forum
The official RouterOS documentation doesn't address this problem.
Grudgingly I dived into the "community support". I simply hate sifting through web fora, no matter which ones. It took hours.
Yes, I was not the only one with the problem. There were messages about the problem without any followup at all; there were quite a handful of wrong explanations; there was even a bit of ad-hominem and mud-slinging.
It did pointed me to the proper solution though:
By default, have their software installed from a "combined routeros package" which contains a selection of individual feature packages. It should not happen but the combined package can become to big for smaller platforms. You have then to switch over to deal with the packages individually, selecting you own mix.
The Solution
My first idea was to delete a few of the 6.46.2 packages which I currently don't use in order to create the space for the complete new kit.
Turns out that you cannot /system package uninstall
anything when everything comes from the "combined routeros".
The only way forward is this:
-
Make an extra backup of your configuration beyond of what the automatic reboot/reset backup is providing. The commands are simple and the demands on precious flash space are small:
[neitzel@lowell] > /system backup save [neitzel@lowell] > /export compact file=cfg-mn [neitzel@lowell] > /file print where type!=directory # NAME TYPE SIZE CREATION-TIME 0 cfg-mn.rsc script 6.4KiB may/27/2020 03:18:50 1 auto-before-reset.b... backup 19.0KiB jan/02/1970 02:42:11 2 lowell-20200527-031... backup 30.1KiB may/27/2020 03:14:53 -
Download the "Extra packages" kit matching your hardware from https://www.mikrotik.com/download.
This kit does not contain just "extra" packages for the more obscure features as the title suggests to me. Instead, the filename is much more appropriate:
all_packages-smips-6.46.6.zip. This zip contains the ten packages which comprise the "combined" = "Main" package (=routeros-smips-6.46.6.npk), and only three extra pkgs:multicast,openflow,tr069-client. (A full listing is below.) -
Download this .zip archive elsewhere and extract the .npk packages.
-
Use scp, ftp or RouterOS'
/tool fetchto copy a subset of the packages into the/filearea for installation. Everybody needs thesystempackage which weighs in with 5.5 MB alone. Another essential package for me isipv6(196 KB) to be able to access/manage the hAP-lite at all.dhcpmight be that thing for you, and in that case you also needsecurity(155 + 307 = 462 KB). And sincesecurityis also required forsshaccess, I used that, too. These four pkgs already total at 6+ MB, enough to get nervous. -
Reboot to install these packages.
-
You only get the few selected new packages.
All packages/features from the old version get removed. The result is not a mix of old and updated packages.
Your new reduced feature set will load your old configration as much as possible. Settings for now missing features will be lost. For example, without the
wirelesspkg, I lost my WLAN definition.Luckily, you didn't skip the the first step, saving your config, did you?
-
With the old version's packages gone, you have now plenty of disk space for the other new packages. Install as much as you want by copying them to the
/filearea and rebooting. -
With all wanted new packages in place, you can now reload your configuration:
/system backup load name=lowell-20200527-0314.backupor
/import cfg-mn.rscAs of now I haven't figured out which is better in which case. I suppose that either would do for me.
I believe you can choose between these two strategies:
-
Exercise some restraint and aim at "below 7 MB for everything", so that future upgrades are completely painless. The standard
/system package updateprocess should download only those packages you have in use.In my case, this would be: system, ipv6, wireless, security, dhcp. As of now, this already totals in 7149168 bytes aka 6.8MiB. Hrrmmm....
-
If you prefer a "all packages" setup, you will have to go through the "update to/with minimal package set / add extras later" on every single update. The only ease is that you can get rid of ballast before doing the upgrade:
/system package
uninstall
will now work. You can then do the (minimal) upgrade and re-add non-minimal packages afterwards. Again, this requires the download of the "Extras" .zip-file. And, of course, the backup of your configuration.
I am wondering how all this will pan out for me. I'll try to automate the "all packages" updates, i.e. the second approach.
Summary
For reference, here is my current lowell
installation and sizes of the corresponding all_packages:
neitzel 373 > unzip -l all_packages-smips-6.46.6.zip
Archive:  all_packages-smips-6.46.6.zip
  Length     Date   Time    Name
 --------    ----   ----    ----
    69713  05-14-20 12:14   advanced-tools-6.46.6-smips.npk
   155729  05-14-20 12:14   dhcp-6.46.6-smips.npk
   147537  05-14-20 12:14   hotspot-6.46.6-smips.npk
   196689  05-14-20 12:14   ipv6-6.46.6-smips.npk
    57425  05-14-20 12:14   mpls-6.46.6-smips.npk
    36945  05-14-20 12:14   multicast-6.46.6-smips.npk
    49233  05-14-20 12:14   openflow-6.46.6-smips.npk
   258129  05-14-20 12:14   ppp-6.46.6-smips.npk
    69713  05-14-20 12:14   routing-6.46.6-smips.npk
   307281  05-14-20 12:14   security-6.46.6-smips.npk
  5330220  05-14-20 12:14   system-6.46.6-smips.npk
   114769  05-14-20 12:14   tr069-client-6.46.6-smips.npk
  1159249  05-14-20 12:14   wireless-6.46.6-smips.npk

[neitzel@lowell] > /system package print
Flags: X - disabled
 #   NAME                    VERSION                    SCHEDULED
 0   security                6.46.6
 1   ipv6                    6.46.6
 2   dhcp                    6.46.6
 3   advanced-tools          6.46.6
 4   system                  6.46.6
 5   wireless                6.46.6
 6   hotspot                 6.46.6
 7   mpls                    6.46.6
 8   multicast               6.46.6
 9   openflow                6.46.6
10   ppp                     6.46.6
11   routing                 6.46.6
12   tr069-client            6.46.6

[neitzel@lowell] > /system reso print
           uptime: 8h49m20s
          version: 6.46.6 (testing)
           build-time: Apr/27/2020 10:32:16
     factory-software: 6.28
          free-memory: 7.7MiB
         total-memory: 32.0MiB
              cpu: MIPS 24Kc V7.4
        cpu-count: 1
        cpu-frequency: 650MHz
         cpu-load: 0%
       free-hdd-space: 7.0MiB
      total-hdd-space: 16.0MiB
  write-sect-since-reboot: 215
     write-sect-total: 194269
           bad-blocks: 0%
    architecture-name: smips
           board-name: hAP lite
         platform: MikroTik
The 22,- EUR are dirt cheap but my time isn't. Automating the the "all packages" updates will certainly be a worthwile learning experience.
How about 44,- EUR for a non-lite hAP? Or a 50,- hAP ac lite? Flash is still sized at 16MiB but you can add a USB stick. Would that help? I couldn't find any statements on this in the manual or product brochures.
If not, then the entire hAP/cAP/wAP range of "16 MB Flash" MikroTik products does not really have a future in the "Stable" RouterOS track for consumers. MikroTik must resolve this issue somehow.
The RB951Ui-2HnD comes at 80,- EUR and with 128MiB NAND storage. This would definitely remove the upgrade pains albeit at a noticeable price increase.
Sun May 24 20:42:05 CEST 2020
Another stab at plan9
I used to run plan9 on my old pentium1 laptop and pentium1 PCs in the last millenium. In fact, I had bought specific hardware such as 3com 3C589 or Orinoco Wavelan PCMCIA devices supported by plan9.
I never had any any luck to run plan9 (or variants such as 9atom) on more modern gear. My only successful attempt to run plan9 on a 1000H Eeepc was with Russ Cox' 9vx.
This day started off with some googling after bhyve
plan9, took a turn via proxmox plan9, and ended
with another read of the 9front pages. Since I'm
running now pretty decent hardware capable of running
qemu, this is now a viable option:
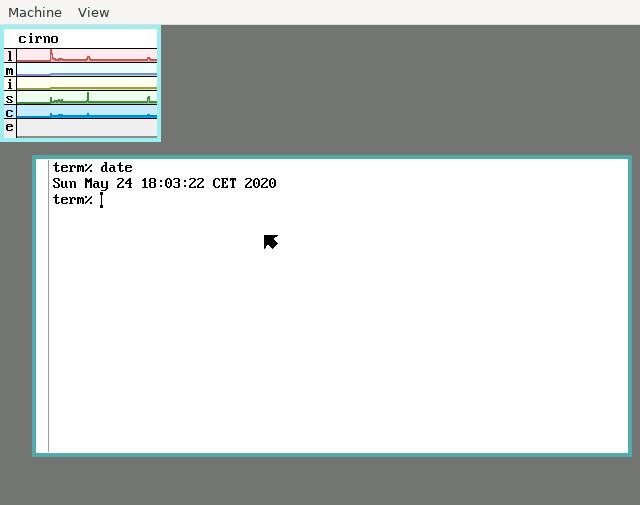
This is just an initial boot. The actual installation has to wait for another day. I am still a complete klutz with using qemu and had to google how to get my mouse back. (Luckily, another machine was at hand.)